3 & 4 - Timeline and Cues
The Timeline module & Cue settings panel can be opened/closed by clicking on the associated button from the toolbar on the right of the Sequencer. ⚓
3. The Timeline module⚓

The Timeline allows you to prepare a series of automated actions that can be programmed with precise timings or even be timed with an audio file. Actions are set up by placing Cues along the Timeline and configuring which event they should trigger once they are reached by the playhead.
The Timeline is divided in three tracks in its middle part:
At the top, the time track, where the playhead runs.
In the center, the cue track, where the cues that trigger playback events are positioned.
At the bottom, the audio track
, where the audio waveform is displayed if you’re using an audio file.
You can scroll along the length of the Timeline using the scrollbar, a mousewheel click & drag, or by holding [Shift] while scrolling vertically. A simple vertical scroll with a pad or mousewheel will perform a zoom centered on your cursor. (You can also zoom out/in with the -/+ buttons on the bottom right.)
When the Sequences module is also displayed, the height of the audio track can be adjusted by clicking on the double arrows button : it either has a minimal height or it takes half of the total height of the Sequencer.
Learn more about all of this in « Module 2 : the Timeline ».
4. Cue settings panel⚓
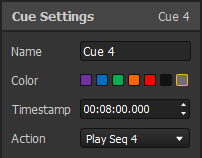
This panel appears with the Timeline and gives you access to the settings of the selected Cue (if there's one).