Configuration
This section contains step-by-step instructions on how to configure your Proxima media server.⚓
Unboxing Proxima 4020⚓
Your media servers is provided with EU, US and UK cords.

The front panel comes with 1 USB4.0 type C, 1 USB3.2 type A and one jack 3.5mm. A power button is situated on the upper panel of the media server.

The rear panel comes with 2 HDMI 1.4, 2 USB2.0 type A, 2 RJ45 ports and a power supply.
Unboxing Proxima 4040⚓
Your media servers is provided with EU, US and UK cords.

The front panel comes with 1 USB-C, 2 USB2 and a power button.

The rear panel comes with 4 HDMI 2.1, 4 USB3.2 Type A, 2 ethernet ports and a power supply.
Before power on⚓
Connect the HDMI outputs of the Proxima server to the video projectors.
Connect the Proxima server to the local network.
Connect a computer to the local network.
Power on the Proxima server.
Retrieve the IP address⚓
When the Proxima server is started, get its IP address displayed by the videoprojectors on the top right.
Connect to the server with your web browser⚓
In the computer's web browser, enter the IP address of the Proxima server to log in the web administration. Enter the default web administration credentials :
Username : « admin »
Password : « admin »
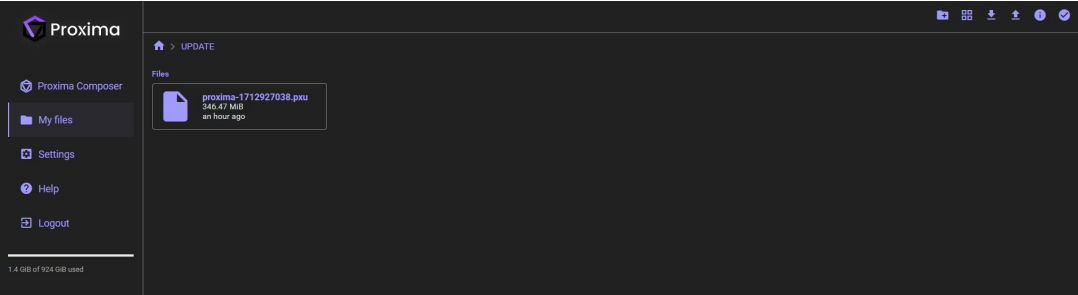
Upload your files⚓
In the Menu Myfiles, drag and drop your media. You can organize your media in folders by using the icons on the top right. In this folder tree, you can also upload the software updates. the last software update has a .pxu extension and must be copied in a specific folder named « UPDATE » created at the root of the menu.
Configure the server⚓
Go to the « settings » menu to configure your server.
Profile settings⚓
You can tick 2 parameters related to the « My files » window. Hide dotfiles will hide .dot files in the file manager. « Set exact date format » will display the date of last modification instead of the elapsed time since last update.
Select your language and renew your password.
Click on save to record your change.
Display settings⚓
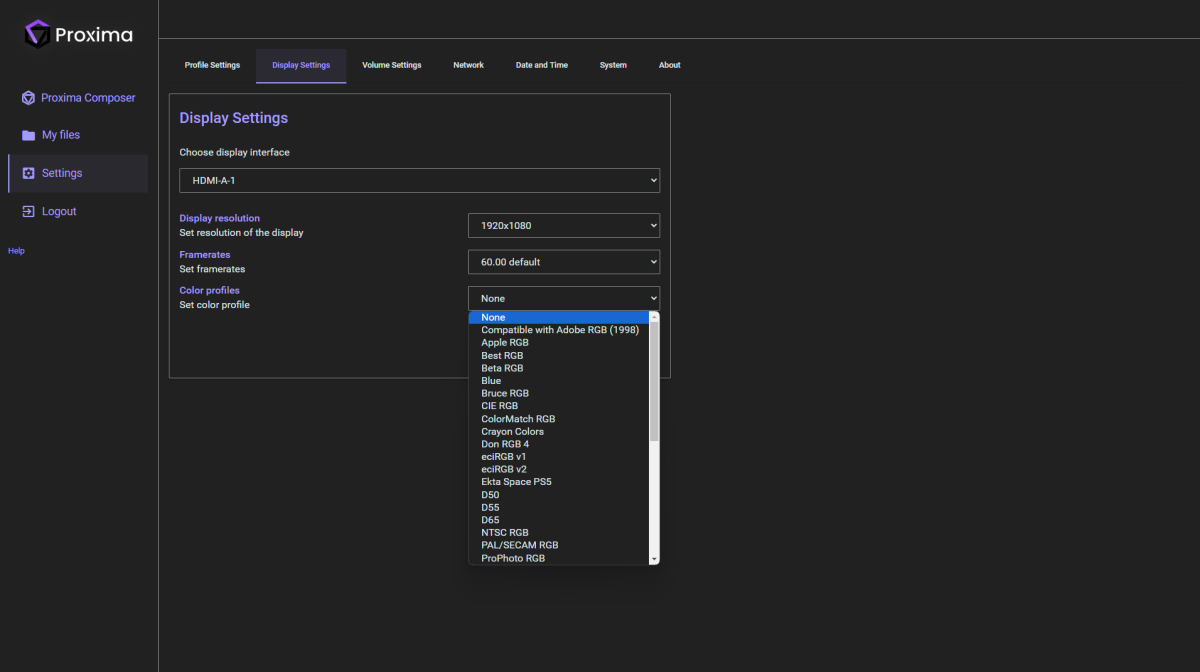
Configure each display individually by selecting its resolution, framerate and color profile.
Volume settings⚓
Set the main volume output. You can also mute the volume.
Network⚓
Choose server's network interface. Also Select the DHCP or static IP modes.
Date and time⚓
Use automatic date and times, set NTP server addresses and select the time zone.
System⚓
Perform the following actions :
Reboot will reboot the server
Shutdown will power off the media server
Update will perform an update of the entire system based on the version copied in folder « UPDATE ». Click once on the update button, wait for a few seconds until a pop up with progression bar appears. Wait until the popup disappear.
Warning :
Do not power off the server during the update progress.
About⚓
This menu displays the current version of the firmware.
Proxima composer⚓
In this menu, you can select one over the 3 modes available on Proxima. The playback mode is suited for automated installations. This mode maximises the stability of the whole system, especially it enable to connext screens to the server whatever the sequence, whatever which unit starts first.
The editing mode gives acces to the composer to create and edit projects.
The maintenance mode stops the composer and gives access to all screens in the display settings of the server.